
This is a simple introduction to help you decide what you need and how to do it.
Firstly there are two different types of set-ups Off Grid and On Grid. If you live remotely and want your own independent power source then you want an Off Grid set-up. If you have a house and are connected to the mains electricity grid then you probably want to use an On Grid set-up, unless you want to use solar to become independent from the grid and have your own power.
As the majority of our customers are off grid we will start with that.
Off grid set-ups allow you to live remotely whether it’s in a van, boat, or remote house you can generate your own power and live independently. The most important thing to start with is working out how much power you use or need. You need to consider your power as a valuable resource and design your power usage to be as efficient as possible. Or you can install a huge system to power a normal house with full appliances if you have the budget to do so.
So to start with you want to estimate your power usage and then work out the size of solar system that you might need. We have created a solar calculator for you to help do this, you simply add in each item that you use and how much power it uses and how long you use it for. Alternatively you can enter an estimation of morning, afternoon, evening usage.
Once you have decided on how much power you need then you can spec out the system that you need. The solar calculator will give you an indication of how much solar and battery power you might want to consider. Then next thing is to consider winter, if you have long dark winters like in the UK you need to consider how reliant you are on your power system, and if you want to add additional panels and batteries to allow for the days where there is very little sun. On a dark winters day you will see 10%-20% of your solar capacity, so you will want to add more panels and/or more batteries to allow for these periods, or consider having an additional renewable source such as wind or hydro or a back-up generator to run from time to time.
System Voltage
You will need to decide on what system voltage is best for you; this is the voltage that you want to run you battery bank at and all the various items that will be connected to it. You can use 12V, 24V or 48V.
If you have an existing 12V system like in a van or boat and use 12V equipment on it then you will want to stick with 12V. If you are wanting to only use 230V AC power then you should probably use 24V for a medium sized install (1Kw-5Kw) or 48V for a large install (2Kw – 15Kw+), the advantage of using a higher voltage battery bank is that is saves you money in the long run as you need less charge controllers and can use thinner cables for the same amount of power. Large off grid house's will use 48V.
So with all of that in mind then you have to decide on all the aspects of your solar set-up. We have built a system to help you design your solar system which will help you calculate what is needed. Or we have created various packages that we have already spec’ed out for you.

1) Solar Panels – This might come down to physical space that you have available or the amount of power you need or your budget. We offer a range of panels all at great prices for you to choose from. You will need to decide on how many Watts or Kilowatts of panels you need and choose the ones that fit you best.
2) Charge controller
Firstly you will need to calculate how many amps of charge controller you need. This is a simple calculation of Solar Panel Watts divided by Battery Voltage. Eg, if you have 1,400W of solar and a 24V battery bank then 1400W/24V = 58A so would want to use 60A of charge controllers.

3) Batteries – You have the choice of batteries
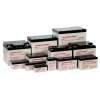
We have some wiring diagrams for how to wire your batteries on the website.

If using large banks of 6V or 12V batteries you are best to wire them into a bus bar rather than just linking them together. This spreads the load more evenly between the batteries giving the battery bank a longer life. It is good to alternate the batteries and the solar input and inverter output across the bus bar, again to give as much distribution of power across the bank. We have bus bars available as well.
All the batteries we offer are deep cycle and designed for use in solar systems.

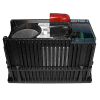
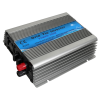
4) Inverter – If you want to run normal mains 230V AC power appliances then you will need an inverter to convert the DC battery power into 230V AC power. You will need to decide how much power you need from your inverter, if you are only running a laptop and a couple of small things then you can use a small 350W inverter, or if you want to run large appliances you want to use larger 3Kw inverter. The Outback and Victron 3Kw inverters can be stacked together to give greater outputs when necessary, including making a 3 phase supply. You want to use a Pure Sine Wave inverter to give a smooth power curve to your appliance to ensure it runs properly and is not damaged. Do not use Modified sine wave as they will cause damage to motors and sound equipment if run from them. We only sell pure sine wave inverters. The outback and victron inverters can be programmed to auto start a generator, or connect to the grid if necessary when the batteries are running low. We would highly advise using the Outback and Victron inverters in preference to the cheaper models we offer where you can afford to, for example if you can cope with 1.2Kw then go with the victron rather than the cheap 3Kw inverter.
Those are the 4 main parts of your system, you will then need cable, connectors and mountings. Most of our customers make up their own mounting systems to suit their needs as it is much cheaper than any of the commercial systems, and we offer cable and connectors on the website.
An on grid set-up is very simple, you simply put some solar panels on your roof and then connect them to a grid inverter which is then connected to your existing electrical network in your house. This can be on any scale depending on your need and budget. If you just would like to add a few panels to start using renewable power and reduce your bill a bit then you can add what you can afford and use a micro inverter to get started. This is very easy, you simply wire the panels into the micro inverter and wire the micro inverter into in your house consumer unit. As power will always take the shortest route you will use the power you generate before any power from the grid, thus reducing your bill.
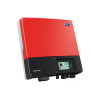
For medium and large installations you have an array of panels (in Kilowatts) and a grid inverter. You connect up the panels into a long string making a high voltage array and connect them to the inverter, which is connected to your electrical mains consumer unit. If you are not familiar with working with high voltage and mains AC power you should seek assistance from an electrician for connecting up the grid inverter.
The size of your on grid set-up will mostly come down to roof space and/or budget, most houses you can get around 4Kw of solar on, and if you use MCS approved equipment and get it installed by a registered MCS installer then you can claim the government FIT payments. But many of our customers just use our cheapest equipment and install themselves to get the free power and reduce their bills.
This can be taken to a larger scale with installations of 10’s or 100’s of Kilowatts or even Megawatts. Installations of over 50Kw do not require MCS equipment or MCS installation, you register for the ROFIT as the system owner, not the installer.
Positioning of Solar Panels
You want to position your solar panels facing south, on an angle of approx. 30 degrees to give you optimum coverage throughout the year. You want to avoid shading on the panels at all times, and if there is an area that is likely to get shaded regularly you should separate it off into its own charge controller or grid inverter.
If you have a house that only has East and West facing roofs then you can install on both to get coverage throughout the day. In an on grid set-up you would need a grid inverter with a duel tracker. In an off grid set-up you would put the panels on different charge controllers.
We often get asked about the actual difference you get between an MPPT and a PWM controller so we setup a side by side test using our Yingli part used panels onto 2 separate 12V batteries, 1 with a PWM controller and one with our tracer MPPT. Panels were set-up side by side angled south.
With early March sun the MPPT was giving 3.7A into the batteries while the PWM gave 2.5A which was 32% lower than the MPPT.
In cloudy conditions the MPPT was giving 1A when the PWM was giving 0.8A (20% lower with PWM)
Both charged the batteries well, but 20%-32% more power was gained by using the MPPT.


 (1)-54x54.jpg)


